Sunday, April 1, 2007

The beginning...

Addendum: In reality today is August 14, 2008. Since I've been making this quilt with some fabulous ladies, I realized that Beth might not want to maintain the Sweet Land of Liberty blog once we are done with the quilt, but that there might be some people who could benefit from the tips and seeing the blocks progress. SO I decided to copy my posts onto my blog and backdate them all for April 2007 into my own blog so that I can retain them for anyone who needs or wants the help in the future. I'll put them on the sidebar so anyone can find them easily.

Thanks Beth for starting the blog.

Here's the packet I received. It will be interesting to see if Dixie and I receive the exact same fabrics. The only thing I plan to change is the colors of the USA fabrics. They sent mostly grays and I really want mine blue and red. This should be a lot of fun to do together. One thing to remember is any size that she gives for blocks: ie... block size, already includes the seam allowance, but template pieces DO NOT. That seems to be the most important thing to make sure of. It's helped a lot with doing the Christmas Sampler. Hopefully next time I'll have something started to show!

USA done!! Part One...the "U":

I got the USA blocks done so far and thought I would take the time to show how the faux paper piecing method works and how I did my letters. It's long and if I have to break up the posts I will, but I'll keep the pictures tiny. It took some thinking but they turned out pretty good. I only goofed once!

I copied each letter with a light box making them backwards as you normally do in paper piecing and then creased at every line to make the fold. Even though this is the A, I did them all the same, starting with the U. Take some of the stickiness off by ironing them once or twice on your board.
First iron the piece big enough to cover the center making sure to have enough all around for a quarter inch seam. Don't iron on the sticky side. Hold it and lay it down, ironing on the paper side.Fold back at the center seam to add the background section and trim with an Add a Quarter ruler if you have one.

You get a nice quarter inch ready to sew.

Cut the background piece large enough to cover all the area and match the seams...right sides together. Lay a strip of paper on the paper so it doesn't bind and sew right NEXT to the paper. Press the seam and then press on the paper side to stick the new section to the freezer paper.

Moving to one side of the U, do the same thing as before. Fold at the line, trim to quarter inch, line up a piece for the side large enough to cover the area and the outer seam allowance and sew. Press open and stick to paper. Above shows just one side left to do!

Last side done, an untrimmed U!

Use the paper side to trim adding a quarter inch to all sides of the outer lines. Remember: the pattern does not add the seam allowance to the template pieces!

A nice trimmed U!
I'll add the other letters separately.

Part 2: making the "S"...

The S was a bit trickier since I had 2 sections that involved more than one part. I had to decide which to do and remove, before doing the second multiple section. I decided to do the small two piece section first. You'll notice if you look at mine and Cheri's pattern that ours are different from the gal who made the example. On purpose, or by accident she made the bottom section on the left much wider by making the lower background section a part of the letter and not the background.

Here's the S pattern above, all ready with fold lines. I did forget to pre-fold the one small line in the bottom section. Again make sure to do your template backwards and draw a quarter inch line around the edge for seam allowance.

I decided to do the smaller lower section first. Just as I did with the U, cut a larger piece, trim with the ruler, align right side together, sew and press open. Then I removed this section so I could do the center section and it's 3 parts. No way to do them while these pieces were still attached.

Do everything exactly the same way and you'll end up with this! This is looking at the paper side in front of the light. You can see the edges cover all the area needed!

I folded back the lower paper section and laid out the section I removed previously and lined it up where I wanted to the be, flipped it over right sides together, lined it up and sewed!

Press open, press to the freezer paper and done. It's not perfect, but I like it. Now add the top and bottom letter sections just like stated before and trim...making sure to add that quarter inch around the template pattern.

The U & S...now on to the A!

Part 3: the "A" and a finish!

The A would have been trickier, but I simplified the template pattern a bit so I wouldn't have to do 2 different sections again. Again I started with the pattern all ready to go with lines folded. I decided that rather than having the background divided into 2 section on either outside, I'd do the center, then add the top chunk and put on the outer background on in one piece.

I did the middle section in three piece just like before.

Above I added both blue section for the sides of the A, then I trimmed across the top and added the upper chunk. I noticed again that the maker of the example decided to simplify even more and make a simple pointed A, but I like the chunkier feel. After sewing on the top, just add the background to each side after trimming!

The only goof I made was yesterday, when I got ahead of myself and added the left side background after adding the left blue, then adding the right blue section followed by the background...forgetting to stop and add the top chunk! SO once I ripped it out I had used the background pieces and had to find other pieces. I like the scrappy look so it doesn't bother me at all.

The finished A, trimmed to add a quarter inch!

Carefully remove the freezer paper and sew together! The pattern calls for a strip to be sewn to the bottom but didn't say how large. Since I have the whole pattern, I looked ahead and saw that it's cut at 1 1/2". I think I'll make mine a bit larger so I can trim it even once the basket is done. I've already made the basket template and folded all the lines to get ready for sewing. I won't show the detail of that one..never fear. I just wanted to make sure you got this technique in case you wanted to use it.

Second Month arrived!

Yummy fabrics and the stuff is so well marked. I finished the basket, except for sewing on the star and I was amazed at how much extra fabric they have allowed. I had tons left over. I am starting the house block tonight and will post the whole finished section as soon as I get it done but though I'd give you a peek at the basket!The only tricky part was getting a small hoop on the work to do the lettering. I like some stability when I stitch. But the iron fixed the bumps! Oh I used red wool felt for the bird like Cheri's quilt did, so much easier and now I have the fabric for something else! the star will be wool felt too, but I'm still waiting for another order with the right color.

Back to work!

Month one done!...


Can't believe I finally got the house block done with all those tiny windows and all the needlework stitching for the cross hatching in the windows. I didn't like the stark white so I went with 3 strands of a very dark gold. Then I made all the strips and finally got to the part where I easily sewed it all together...eeeekkk....not so fast!

Slight problem...the USA block is sitting there at 12.5 inches and I measured so I know it's the right size. But the house block according to Cheri's dimensions finished at 11.5 inches. Ah the joy of Cheri's quilt patterns. I don't care about adding strips here and there, I'm fine with that 100%, but I wanted to know if I did something wrong of not. No, by the way, I cut them all the exact sizes given. Then I went to check out Cheri's quilt and saw the issue. She didn't get them to even out EITHER. Notice in this cut from her quilt picture that she has four (4) side strips on the left. Blue, red, plaid and another larger blue one. SO I picked out some left overs and made another strip...which I am fine doing.

IF I had wanted the backing to equal out right I would have had to add 1.25 to the backing. If you'd rather yours not have the strip then figure out your size and make the background wider. I also looked at the sample that came with our pattern to see how theirs worked out. If you check out the right side of the A, you'll notice that they wacked off what I guess to be 1/2 inch from each side to make it fit. Her A is almost gone on the right side.

So, just stay aware and chose which look you like best. OH and it's not listed in this section of the pattern...but rather later...that you need a strip on the bottom of the USA to make it fit with the basket block. I cut mine at 1 3/4" and only had about 1/16th to trim. Lay your blocks beside each other and see what you need.

I have a few other things to get done before I start block section #2. If you have any questions...lob them to me. I'll help in any way!

Started Section Two...

Well I got the eagle all finished and I like the color changes I made. I didn't go with solid muslin, simply because I didn't have any, but I also didn't want stark bright light muslin, but now I'm thinking it wouldn't have been bad. We have another block coming up that I will do in muslin...or a thicker version of the same color.

Anyway, quit rambling... the block! I think these instructions are going to be best described as measure six times...cut once..and then add what you need! I know every Cheri quilt pattern has that first explanation page where Cheri says...cut piece sizes already include the seam allowance, templates pieces and paper piecing DO NOT include seam allowance. SO I think that's where I messed up on the USA and had to add another piece Beth... I added an outside quarter inch seam allowance when I didn't need it. After doing this block I don't think those rules are set in stone.

Here's my little bit of advice:
Watch your sizes!! I had this pattern already and the sizes on the new pattern that's coming with the BOM are different... larger. Heck when they re-drew the flag it got a 1/4" longer on this new pattern piece and the strips went from 11 1/2" to 11 3/4"!! The flag needed seam allowance on the top and bottom but not the sides to fit the strip sizes they listed to go around the finished section. No biggee, I had plenty of fabric luckily and my flag just fit. Then I cut my strips and all goes together well and perfectly.

Except...LOL!!! That the block is now about a half inch bigger...longer...than the house & basket block that it gets sewn next to in the row. ?? Either I am over analysing this to death or what everyone told me is true. The measurements are a bit off.

So heads up. I like mine. I'm gonna wait to see how big the flying liberty gal turns out and work from there. My friend Libby put a strip under her first section to make it equal to the next section. OR I can cut a bit from the top and bottom of the eagle block and be cool with that too. I've almost gal liberty gal done..I'll show pics when she's finished!

I must say even with all the trouble.. I LOVE this quilt!

Month Two complete:

Thought I'd post a picture of the completed second month's blocks over here. I always post to my own blog too, but some of you might not read that, so I posted here as well. Since this is what the blog is for anyway.

Here's the flying liberty lady, as I call her. I'll add all the buttons after quilting.

Then the two blocks put together in the grouping. I'm really loving the choices they have made in fabrics for this BOM. Plus they send so much! I already have a bag full of scraps and some larger pieces I switched out for other colors.

Now, anyone else planning on starting soon? Dixie, are you getting closer to getting started? Can't wait to see how everyone else does their blocks too. I'm working on the Christmas Sampler a bit then I'll get to the 3rd packet of blocks soon...maybe in about a week! I'm trying to stay current and not get behind...which causes me loads of trouble when I'm doing so many things at once. Hope everyone is doing well!

Tips for section 3...

Just finished this stitchery last night and I have a few tips for everyone. I had to cut the block about 1/8 taller because the embroidery words are too big. If I had bothered to measure before I started, I'd have seen it.

When you copy the pattern don't put your "d" up as far as they say, mine got chopped off when I sewed the star. I didn't want my T completely chopped at the bottom, so I made sure I had the extra room to clear the quarter inch and then a tiny bit. I'll just make the side stars about and 1/8th wider and take it off on the squares under the star.

If I did another one, I'd lower the d stem down a touch and then after copying everything but "To God," I'd move the fabric down a bit so the "To God", moved a bit closer to Thy. It's got room and that way it would only be as long as the star on the other side. Just be careful so the words fit in the 6" finished size.

Month 3 completed...

The pineapple section is super easy if done using the freezer paper piecing method I showed you earlier or your preferred method. Lots of fun and would make a great quilt on it's own! Once I got the background done I sewed on the stars and did the embroidery work.

Well I did stick to my goal of getting the current month done before the next installment arrived, however I think that's mostly due to HH being late with mailing out Month 4.

** TIP** See those squares on the bottom of the hand block? Those don't appear in our instructions. I went ahead and looked for the instructions for putting the row together in the whole pattern I have. Now, there must be a typo because it said:

6- 2 1/2" 2 11/8" squares for below the hand

Now what do you think they meant? First it shows 8 squares in my picture. Another shows 6. If they meant 2.5" x 2 1/8", then 6 isn't enough. I cut mine at just that size and cut 8 squares. I ended up with about a half inch hanging off each side and I was fine with that so I sewed and chopped. The 2.5" is right for the length, vertically...so you can either figure out what you need equally and sew a strip on the bottom under the squares to make the difference, or do something like I did. I just wanted to share what I did and what the pattern called for so you could sew your section together.

Googly Dolls and the Tin Soldier

I set today as the day to start sewing Month 4! I got most of the pieces cut for the Googly Dolls last night and the little piece ready for the Tin Soldier words. I embroidered the words on before cutting the piece to it's particular size required. Easier I think, or you could wait until the block is done before doing the words.

Just got them finished and sewn together and I really like them. These were a bit tougher to make and I totally messed up the first one and chopped off a huge part of her dress. Here's the paper piecing sequence I used.

1. Cut off the head corner part. Head first, then each side and set aside. Make sure to leave a quarter inch past the paper on the bottom edge for seam allowance.
2. Center between legs first. Sew each leg, then beside legs. Then you can trim across the top of all those and sew on the whole dress.
3. Here's where I goofed. I thought I could sew on the under arm background, then arms, etc. Wrong! I folded back the paper and trimmed off her whole shoulder! So I ended up doing it this way...
Cut the paper pattern right beside her dress and do the underarm background, arm, and side separately and then carefully add them back on watching out to line up your edges again. It's a bit of a pain, but no other way I could figure it out. Make sure to leave the seam allowance again where you cut the pattern apart!!
4. Sew the head back on and press, trim to 6.5"

Tomorrow, the house. I think I'm gonna do mine backwards. I'd rather the flag just covered some of the house back and not the cool triangle gable on the front.

Month 4 almost done...

Almost done...Well everything but the hand sewing and the bottom strip. Once that goes on I can sew on the sq in a sq blocks on the side. I switched my house since I didn't want the flag to cover the front of the house. I still have to sew the flag on next to the blue doll.

Here are my tips for the house block.
1. Dixie...be careful of the red fabric you get just enough. I had strands left. Unless I cut wrong and I don't think I did. I cut the 5 3/4" strip off the side of the rectangle and then made all the side pieces and the front from that section. It left me just enough to do the top of the roof with cutting a 1.5" piece for the chimney's.

2. Remember to cut your bottom white strip before you chop up the white...it's something by 9 inches long, but the measurement is on another page!

2. Don't cut the length/height of the blocks above the house until after sewing. Cut the width and sew, then trim. Mine came out 3/8ths too short and I had to chop off some and sew a strip on the top. If I had left the pieces long, it would have been easier. I checked the googly dolls to make sure they were the same size as the red star liberty flag block that it gets sewn to...all good. So I improvised. Thats what I love about these quilts.

Strip size...

I thought I'd give a bit of info I had to go look up. Not sure who has instructions or not for this but figured I'd share.

See the blue strip under the dolls and the house? It's:

2 1/4" of whatever to fill the space all across the row.

It continues all across the whole row to under the Liberty guy, pineapple, etc. You fill in with whatever left over pieces and things you want. I believe that the pattern gave us the drawing for the little hst portion under Liberty guy, and the flying geese under the house. Once I get my hand sewing done, I'm gonna put the row together and sew on the strip, so I thought I would share!

Starting Month 5...

I figured since I had a lot of stitching to do, I'd start the main block of the current month right after I received it. Luckily it really wasn't all that much stitching. I did make a few mistakes though... I merrily sewed along adding all the parts and then put down my 8 1/2 inch square ruler and ACK!! No way the feet and hands would it fit!!

So I pulled out stitches and pulled off all 4 feet and the guys outside hand and started chopping the extra fabric off. Think about something I didn't...you need to probably cut your 4 strips of 1" fabric before you bother to start stitching. Silly me chopped off the excess and tossed it then, duh! Where's the fabric for the outside!? Luckily I had something similar. After I got the borders on I added all the feet and hands back on! The rest of the work should be easy...a simple heart and a checkerboard with stars.

Row Assembly...


I stuck my whole row together... neat huh? Decided I wanted to go ahead and make the row of leftover bits for the bottom so I sewed all the blocks together and made the row...as requested.. with 2 1/4" of whatever to fill in the space. Left over hst's and the pattern even has a template for making the wonky half square triangles under the liberty guy!

Month 5 complete...


Got this months package all done and finished, ready for the next section which should show up very soon if my timing is right.

No surprises about these blocks, they are all pretty straight forward except that the heart block just says add 1" sections as needed. I looked at the pictures and just sewed enough to get me the length I need for joining the pieces and then trimmed after I sewed. I left the piece on the left wide so I can trim after I sew it together with the finished row above it, when that time comes.

I did notice that we have the embroidery pattern for an upcoming block added on these pages. Guess I'll keep that handy for when I need to go back and use it!

Month 6 begun...

Hope you are all working away still on your blocks. I'm actually going back to the Christmas sampler and doing a few left over blocks that are machine pieced...only thing I can do at the moment. But I did get my Snail's Trails blocks done for last months section!

They're pretty easy block to make if you have them laid out to keep the pieces straight and in the right place. I did change a few colors. Added the last gray plaid and changed the 3rd block to blue and beige.

Skipping over to Month 7...

I'm able to get the hand sewing done now, but boy I sure found out yesterday that freezer paper piecing IS the thing that sent my arms over the edge with pain! Yikes these blocks killed me yesterday! But they look good!! I'm jumping around a lot because I got behind so these aren't going in perfect order and I'm also doing sections as I can get them done too. So when I get a whole piece done, I'll post again with the complete picture too. I sewed the fish just last night as will show him later, but I spent my time yesterday afternoon making funky stars!

Cheri's pattern is the template pieces so you can do them any way you feel comfortable. I use the freezer paper piecing (FPP) method I showed before many times. I tried my best to not have to cut, but no chance...had to be done. These are the cuts I made.

The top and bottom can be done in one row, starting at either end you want and working across. But then the center has to be cut into 2 pieces. Doesn't matter which place you cut just make sure to add the center section to one of the sides. I started on the side with the background, did the two star tips, then added the center. Do the second center section and then seam them together. Here's me getting ready to sew the last seam...

I've done the bottom and top and just lined up the center with the star tips and sewn together each section. It doesn't have to be lined up perfectly with the paper seams...the center fits with the star tips and it's funky enough that if they don't it's okay too!

A finished star! Oh watch your colors if you don't want the same color next to each other like me! I did the sections and didn't pay attention until I was sewing together and realized I had the same red next to each other!

The whole row completed but not sewn together yet...Note that Cheri turns the last one sideways and adds a strip! I haven't trimmed that either yet.
I'll wait to sew them together until after I add the star parts to the center star. I made the center muslin and I'll add the blue field, and then red strips over the muslin and that will make the star! I think that's how Cheri did hers, although the pattern calls for making white and red strips...I like this idea better.

***EDITED TO ADD:My pattern didn't include this part. The star has strips placed around the edges...1 1/4" strips around 4 sides. ALSO the strip on the bottom edge of the 3rd star says 1 1/2" but I cut a wide piece and trimmed after I attached them all together to be safe!

Back to Month 6 for a bit...

Before I actually started the stars the other day I got the liberty fish done...Now notice that I have quite a huge chunk of fabric to the left...well this must be there because you can't make the fish without having the Victory flowers background attached already. SO in our BOM they sent us the block that included the Snails Trail blocks and the liberty fish but just the background for the flower pot block.

Since I'm behind due to arm problems I got the pieces for the Victory flowers a few weeks ago and started sewing those last night. I'll show you the whole block when I get that done...just a few more things to add, but the hands need a little break.

**TIP: don't pay attention to my strip size on the fish bottom. I don't have a clue what size width I cut those strips but it was wrong! Works for me rather than all the skinny strips, but I could change it if I wanted. It still has to be trimmed to the final size too.

Completing Month 6 and 7...

Got the Victory flowers finished and just before I was about to give up too. Those last 2 letters really worked the last muscle and now I am on a small break from handwork...few days should do it really. But it's done!

Now you can see why they sent the background to us early. You guys doing Buggy barn probably got this whole section as one block. Now we add the Snails Trail blocks above this section and add the appliqued bell next to the flag and this section is all ready for joining. The pattern calls for a strip to be on the right side of the fish but my pieces fit without it, so I'll wait before adding it until I have more sections to fit together. It's easy to add later.

Completed Month 8...

So here's the next section all finished...Month 8 done and ready to stitch together with more completed rows!

I showed you how I made the stars previously so they were covered. Not too many tips about any of the other pieces really. I somehow didn't end up with my flying geese looking anything like Cheri's and in the future I'm gonna make my own template with the outer dimensions the same. I don't like how the tip switches place when they are turned back and forth too much, and one side should be up more...but eh, what can you do after the fact.

I will say that after quilting through the wool felt on the Christmas sampler with an all over meander, (UGGGG!!) I am taking Libby's cue and making the new ABC Sampler...all cotton! I had almost decided to re-do the angel block with all cottons, but since I have wool in this quilt already, it stayed as is. Besides, I've decided that I am not going to all over meander this one too. I'm going to quilt in the ditch with some hand work added into the larger areas...and going over the wool won't be done! Hope you like the block!

Month 9 finished...

This get me all caught up on the Sweet Land of Liberty packages that I have gotten so far, I don't expect to see the next one arrive until almost Sept. 1st. At least I can not worry about this one for a while.

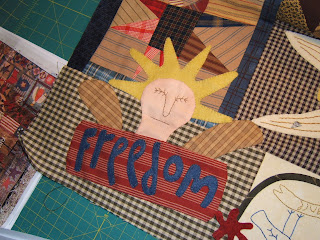
This was a perfectly straight forward block done in simple needleturn applique. I did use wool felt for the head, feet and halo. I also cut my strips before I started sewing the applique just in case I trimmed and forgot to leave long strips for later...(don't laugh, it's been done before).

Previewing Month 10 to come...


Just thought I'd check in here. Just got my latest block package and I was doing a few Christmas and fall things, so It's been patiently waiting for about a week but I'm set to start stitching soon. It's very small section really. Actually makes me think we could have done this much faster than 14 months, but what the hey.

Here's the section of Cheri's that I think we are working. I say think because the instructions were not all together clear this month. But I'm fairly sure those are the fabrics I got.

Hope some of you are working along too. I'm gonna start the ABC Quilt Sampler really soon too.

Month 10 complete...


...plus a little bit more. Since finishing this block required it being attached to the bigger piece I decided to go ahead and add more blocks so I could sew everything down.

I'm not sure why this month we got 2 very tiny blocks to do...heck after the last 2 months of having huge sections, it's a bit odd.

So I grabbed some red and white and made the flag stripes so they could be sewn down partially. I sewed the seam leaving about 2 inches towards the bottom to attach the blue star field and the other blocks before sewing the whole thing together. This let me sew the whole Freedom angel and lay down the flowers and bias tape around the Rememberance block.

I'm actually ready to get this finished so I might either call Homestead Hearth and ask the possibility of having them send me all the rest NOW, or just use my own fabrics and the massive ziplock bag of scraps from the past months to go ahead and complete it now. I hope some of you are still working...it's a great quilt.

******Remember MY contributions to this blog can also be found over in my blog archives located here!