Thursday, March 1, 2007

T is for Tinman....


Oh this block reminds me that I love Cheri's designs in spite of the sometimes harder than needed measurements! Lordy did this block tax my brain. Not the whole block mind you just the head of the tinman. If you can do it with the given directions, then by all means, knock it out and count yourself better than me!


After fiddling with the head a few times and not getting it right, I finally drew it out and figured out the finished size needed to get a perfect head ready to be sewn on the top.

Save yourself the time and make a sweet little flying goose block. Cut a body piece 1.5" tall x 2.5" wide and 2 small 1.5" sq's of bkgd fabric. DO the sew and flip method and you have the head all ready, perfect size to fit into your design!! I decided to write my wording down instead of cramming it in there to read normally, but it's totally your choice.

You will also make 2 square in square blocks for the bottom under the Tinman, and I really can't tell you what size they should be. I made my triangle pieces larger as I normally do then trim down, but they didn't need trimming and when I finally sewed them together they seemed to fit across, so I let it slide. This quilt is about working with what you have and doing things in a folk art manner. I don't need to see all the tips and points. Just have fun with it all.

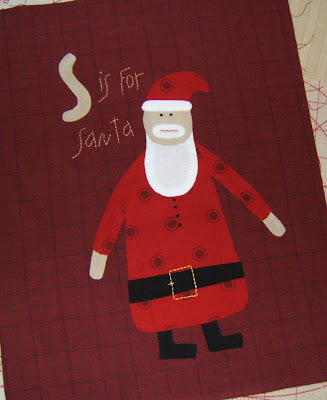
S is for Santa


Santa was a blast to get done. He's mostly done with applique of your choice so there are no secret tricks or tips here. Just have fun with him, take you time doing his face and little thread parts and keep him neat.

I've been adding more capitol letters to the blocks and this was one that worked great for just that purpose. A big capitol S started out the S is for Santa wording perfectly! Keep him a bit larger until you know what his trimmed size will be.

R is for Rooster...

Extremely simple and easy to do.

I used freezer template to pre-turn the rooster with starch on the edges and also did all the tiny parts for his head. I never like to stitch with a hoop mashing my applique so I laid this block out very well and made sure I knew where the Rooster was going when I marked for the embroidery. I stitched all the work using a nice fusible backing for stiffness, and then once done I sewed down the rooster.

Easy as pie!

NOP block

Wow did this one take me quite a while to do!Nine Orange Pumpkins...I love how Cheri incorporated all three letters in one block. Making the background and the pieced pumpkins is not hard at all and you can follow along very well with her pattern sizes. I did my embroidery after I stitched down the applique pumpkins.

But as easy as that was, the letters are just plain tough to sew in the size given. I would have enlarged them, but I was worried about running out of room. I wish I had gone a bit bigger, and I wish I had done the in sections. What I mean is...more like the d,e and f letters. One piece for the stem and separate pieces for the curved sections. However, I didn't and it took time to get them down with most ending up only being a 1/4" wide at the end.

Q is for Quail


This block is pretty straight forward and easy. I used a quicker methods for getting the applique pieces ready...using doubled up freezer paper and starch to turn under the edges before sewing. I decided to do this because I wanted to know exactly where the pieces fit so I could mark all the wording, star and head curl first and get that part sewn BEFORE I put down the applique. I hate having to sew embroidery and crimp up all my new fabric and stitches with a hoop!

M for Mother...

Now this block is lovely to do and you have two choices as to how you want to make yours!
I noticed in the instructions for this block Cheri made hers by making the center section as a completely separate section that is then appliqued to the background containing the border. My bom pieces didn't call for doing this as they included strips for making the border and sewing it on afterwards to the center section. I switched out the border fabric for one of my own...heck I switched out a lot this month!

In Cheri's way you have to stitch down the center..then embroider, or mark it well, embroider the edges and then sew down your center. I didn't care that much about having border seams so I did them my way...again one of the things I love about quilt making!

So you have to choose which method you want to use. I made my border strips much bigger so I had something to grasp onto with the hoop and could trim them later for a nice un-raveled edge. Sewing them on as "borders" also made it easier to sew the embroidery close to the sewn edge. In this case I stitched the words before adding the borders. I marked the seam and gave myself another 1/4" of space and marked the words. Then I sewed them on looking at the pictures for a guide and finished doing all the feather stitch after all the borders were sewn on.

BTW you don't have to do a feather stitch. Libby did hers as a sweet curly backstitch line that loops around the block and it looks lovely. I just happen to love featherstitch!

I thought about doing a larger M on this one too but couldn't make it work to my liking so I left it off again. I figured N-O-P is right there as well as adding a big S for Santa so I'm happy with the mix so far.

K is for Kite...L is for Log Cabin...

Sorry ladies, I sort of slacked on doing these individual posts for the quilt! This one was a fun block and it's attached to the L block too, so two blocks in one...so to speak!

I've actually gotten used to doing as much prep on the applique pieces as I can using the starch turning method. I use two pieces of freezer paper, ironed together to make a reverse of the pattern piece and turn those edges using the starch and water mixture. Boy it saves a lot of turning with the needle and for my arms it's all good since that hurts the most.

Even the tiny head and hands got pre-turned. I like the idea of seeing a BIG letter before the wording so you can keep up with what the blocks stands for so I made a larger K by turning under a strip of bias and forming a capitol K. It was fairly simple and made from 3 separate pieces. I use Roxanne's glue Baste-it to hold the legs on before sewing. I actually made a larger L but didn't like how it looked so I left that block as is.

Luckily Cheri gave us great measurements for all the strips needed. I did increase the size of the Log Cabin piece in the last row so I had plenty to turn under for stitching. That extra quarter inch helps give you something to grab onto when getting a good turn and just make sit a bit easier. You don't have to do it, it just helped me a bit.

Again, I did the tiny Log Cabin first, but did not sew it on. Instead laying it in place and marking the embroidery, then stitching it before adding the applique piece afterwards. That would have been very hard to hoop over it with all those seams.

Top section done!

So I finally got to work on this again! You have to open the picture for a much better view!
I made the J and sewed that to the side between GH and I. They sent a straight piece to work with but I replaced it with a bias strip simply for ease. It's just too hard to bend straight pieces and I don't have a tons of curve but it's so much easier to curve bias!

Once both pieces were done and the same 17.5" inches tall, I simply added a 4 inch piece to each section and sewed them together. The left goes under the blocks and the right, above the blocks. Now...my pattern calls for 4" pieces in that little map..but I'm not sure Cheri's original pattern really said what to use. Since they are the same size you could use anything really. Just leave enough room for your flowers, basket, vine and numbers. No numbers?

Never fear...the numbers will go on tonight over to the left! I will sew the lower flowers on after attaching the next section since they go below the sewing line, as do the flying geese below Grandma's House. Then sit back and enjoy having a good section of the quilt finished!

GHI complete...

Got the finished GHI block all done and it's patiently waiting for me to finish my quilting explosion to be added to the ABC & DEF blocks for the whole top section. It's so hard not to rush and work on this exclusively...but I have plenty others to do and I really have to get the Sweet Land of Liberty done too. I don't have all the packages for the SLOL borders yet, but I do have a lot and the economy blocks and flying geese are patiently waiting for their turn too.

SO back to the block. you know I can't say this enough. These really are done best when you let things happen and just work it out in the end to get the finished size. Another block here that quite frankly I had NO idea of the correct size. We discussed the GH part and the I section was no different. But it's fine! Mine isn't going to look exactly like Cheri's or Libby's or Susan's or anyone elses. It's got my unique measurements and style. That's a GOOD thing!

SO here's what I came out with for this block. Remember back to the ABC and DEF that are sewn together. Those measure 17.5" high as is...then they have a 4" piece sewn to the bottom of both blocks. The GHI section also has a 4" strip sewn to the top of that section. So it stands to reason that it needs to be the same height as the ABC&DEF section..follow me? This makes them 17.5" tall. Working off that, I sewed the bottom strip on the GH part and cut the whole thing to 17.5" tall.

Then I made my little blocks...are those J's??I had no luck doing it the way Cheri suggested so, knowing it was to be 8.5" in the end, I cut my pieces and trimmed them to 2.5" hst's. Then I made my little set of blocks. Make sure it's 8 1/2" square. Next I made my "I" and sewed large strips (probably 2.5 and 3") to the sides, top and bottom and appliqued on the ice cream cone. I knew it had to be 8.5" wide to join the little blocks...and 9.5" tall to end up measuring 17.5" when sewn together. It's nice to have extra room so you can cut it on an angle before joining with the blocks. Yours might not be this size, just figure out your size needed and work with that.

Now on to the joining of the top section. Although they gave us everything for the applique, I won't be able to do much since it requires the other lower sections below to be attached before sewing on most of the pieces. I'll do what I can before moving on. Next up...the Kite and Log Cabin blocks!

GHI block...

without the I for the moment. Well what can I say. I am loving these blocks but I am not loving the measurements, or lack thereof. But if you love Cheri Payne, then you gotta love doing these with all the quirks. Here's my Month 3 as it was sent to me. G-H-I block.By a weird coincidence I had the exact fabric Cheri used for the house! Here's my block. This block has flying geese on the bottom, but they were in the next month with the pieced section so I'm getting to that next. I just realized I didn't sew my little grass embroidery either...must do that! Also I left off the I and the ice cream cone so I can talk about measurements. Ah the dreaded M word.

As I start each block, I've been checking the math. SO first I started with the pattern. The pattern calls for the left heart block to be 5" wide cut...but remembering that the s/a is still on the outside edge...you add 4.75" + 3.5"+3.75" = 12 inches. No way can 12 inches sew to 11.5" for the background. SO there's a goof there.
Next Cheri says to Add Borders around the left, right sides and the top. That 1.5" mark is my writing, not hers. No size was given. I am sure that she just adds 2.5" or 3" and trims later. That's probably a good idea. In fact if you look at her quilt close up, this block was cut slanted. You'll also notice that the left strip is small, the top wider and the right even wider. I got curious, so I went to my other copy of the pattern and I found a completely different diagram of the block drawn by the bom teachers with totally different measurements. See that heart block? 4.5", I was right.

This one seemed to fit the space better. It ends up 17.5" long when done (but not sewn into the top) and that's the size it needs to be to match the first two blocks. My advice would be to either use these sizes OR sewn on extra large strips...3 inches or so and trim later. I used these sizes. I'll add the geese background and then add those once I get the block sewn into the section since they overlap a bit on the piece below. Now I'm off to do the I for Ice Cream and the pieced blocks underneath.

D,E,F block

Since I am a bit behind with this quilt, I hope to get the blocks done faster than normal so I can get to the point again of one a month. This one really took some sewing! Whew...this was like making a mini quilt! There's more going on in this block than some of the recent Cheri quilts! Ta-da....the finished DEF block! Now let's do some work!

Since I had some tiny issues with fitting blocks together in the other sampler quilt when they involved using templates, I decided to sit down, take a few minutes of time and DO THE MATH! Some times you just have to! I took each section and added up the pieces making sure than the measurements added up to what the next strip or block said it needed to be to join correctly. Luckily they did... with just one mistake. Let's talk dolls first.

The pattern doesn't tell you this but the dolls size should end up at 3.5 x 6.5" cut. Meaning that's the size you will trim the outside edges when you make one doll. Be sure to add that outside seam allowance to the template when you draw it. I used freezer paper and cut it apart right under the dolls dress to make 2 pieces. REMEMBER!! you have to leave a seam allowance on that edge so you can sew them back together! I sewed the pieces on in the numbered order, attached the legs and made three dolls, sewing them all together.


I knew this was the correct size by looking at the strip sizes. See that first strip on the left side is 1" x 6.5", so figures they are 6.5" tall. Now adding the 1" strip on the right and all three dolls gives you a piece that measures....and I mean laying on the cutting surface, it measures... 3/4"+ 3" + 3" + 3.25 = 10 inches. I promise this is the only time I'll use the scary math problems. Remember the extra quarter inch is on the sides because you haven't sewn it to anything yet. Now I KNOW that it's right because the next piece to add along the top is 1.5" x 10" so that's how I checked my sizes!! See not so scary after all.

Now the goof. One measurement is wrong. Look at the chart again and see that you sew the 3 dolls, then add the left, top, right and then the BOTTOM strip in order. That size for the bottom strip should NOT be 11 1/2"... it's only going to be 11". Below you can see my piece.

I think almost everyone will realize this when they start to sew on the strip, but some might think they goofed making the dolls. Nope, just a little goof. Once I sewed the bottom piece on I sewed the second left section and then stopped to do my hand work. I always find it easier to sew applique onto smaller pieces. SO I took the time to sew on the doll's heads and do their hair and faces now. I also sewed together the background of the flower and the duck into a section and did the hand work on those pieces. I actually tucked the stem into my seam.

Then I sewed all my flower pieces, stems and leaves down before attaching the sections. Once those two sections were done. I started to assemble the block. Sewing the flower on top of the doll section, then working down the left side. I altered the pattern a tiny bit by adding a strip of green under the second section. I just stuck that piece in down the row and trimmed off the extra at the end, before sewing the big piece across the bottom. Now the hand sewing begins!

I approached this block a little different than normal since I wanted to conserve hand movements, so I got out my starch and freezer paper and did that method of turning under the pieces that could be done ahead of the time. I did all the letters, the duck, heart, and flower circles. I even pre-pressed the edges on the background pieces behind the letters!

I love this block. You should feel good once it's done...it's a lot of work. I changed up the colors from the bom package, which is the fun of making quilts. Now onto the third block...houses and cats! I'm adding another one someplace since I can't leave off one of my babies!!

Month One...abc block

***Since I seem to be the only one doing this sampler of Cheri Payne's I don't have another blog that follows the progress of each block. But I liked how we did that with the Sweet Land of Liberty quilt. So I decided to put all the blocks and instructions together on the same date just like I did for the SLOL block hints. All these will be under March 1st, 2007, and in order, so anyone who comes across these later can use the tips and pictures to help them make their own quilt.***Remember that in reality these post were written starting in October 2008****

Month one was fairly easy. Buggy Barn provides tons of fabric and I have lots left over. I chose to cut out the ABC letters and sew them with needleturn instead of making them out of bias tape as Cheri did. Just easier for me.
The branch stems are approx. 1/2 inch and just steam ironed over as were the legs.
Also missing on the pattern as it turns out is the size of the border strips around the block. The pattern I have calls for them to be 1 1/4" cut. (1.25")...they will finish at 3/4 inch.

I think Cheri probably just sewed on larger pieces and cut them down once she got to assembling the blocks, which isn't a bad idea really. Would have helped me with my goof! Enjoy!

**OMG!!***PLEASE PAY ATTENTION WHEN LAYING OUT YOUR PIECES! I just realized I made this block WRONG!! It's supposed to be taller...not wider. Oh well that's the beauty of her quilts. I'll add a 1" strip on the bottom and trim the side pieces or more likely make up the difference in the I and J block that has wider side pieces*** oh lordy, I just made the background and then laid it out as I normally would paying no attention!