
When I saw Billie Lauder show this new trick I was super excited and I ran to make one. I had liked the Brave New World block and was planning on making a quilt with it from the book called More Nickle Quilts, but I hated making all those triangles. So Yippee! I was off. Of course, she gave her directions for just that block, I needed another size. So I broke it apart and figured out how it was done and HOW to draft any size I wanted.
We all know...When you sew 2 triangles together, it takes a larger seam than just 1/4" added to each triangle. That's the 7/8" rule. Beginning quilters learn that quickly. This works because you can get whatever size square you need by adding 3/4 inches!! I'll explain further.
1. When you sew on a right angle through those two rectangles you need more than just your 1/4". If you look at the distance between the cut edge and the sewing line and measure it...it comes to 3/8th of an inch!
What I am attempting to show you is me measuring what the distance between the cut edge and your sewing line. I measured along the black line ...measuring the space between the tip of the ruler where the arrow shows and the dotted sewing line. This equals 3/8". Enlarge and look.  If you remember we have the center cut line and then 2 sewing lines. So we have 3/8 + 3/8 = 6/8 or 3/4's of an inch. That 3/4" is what you will ALWAYS add to each section and measurement. That makes no sense now, but I will explain. Figure out the finished size of the block. Lets use the one we just sewed. These blocks are nothing really but a 4 patch.
Once you know the finished size you can determine three things. Your CORNER SQUARE SIZE, the LIGHT RECTANGLE SIZE and then the SIZE FOR THE RECTANGLE OF COLORED FABRIC for the larger triangles. Look at the picture below. It looks just like the four sections after they are sewn together into a stretched 4 patch.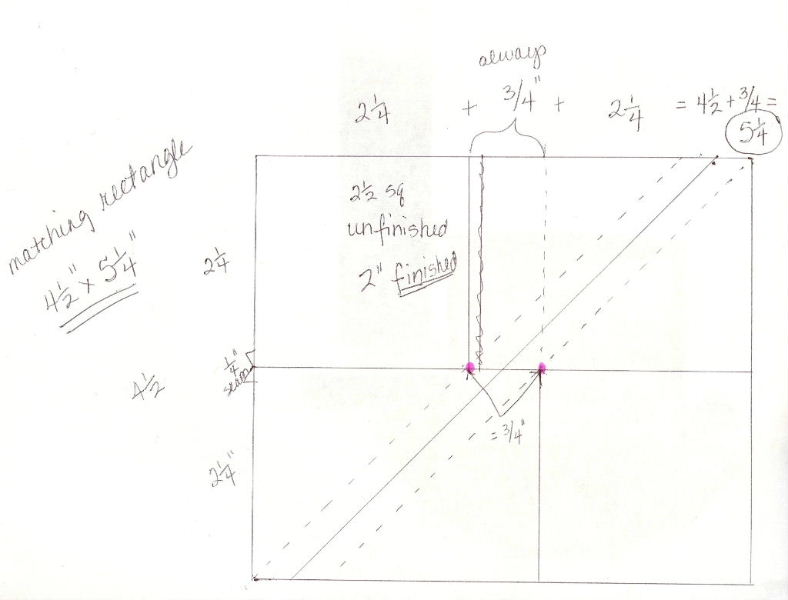
We made our squares 2.5" (2" finished) which makes a 4 1/4" finished block. If you look above you will see that the patch is really just the size of the squares PLUS the 3/4" extra in the center between the two pink dots. So the square is 2.5" The RECTANGLE will always be the size of the corner square + 3/4" X the square size. So we cut the light rectangle at 2.5" x 3 1/4". Now follow the top measurements and see that once the seam is sewn you lose a quarter inch of your square size, making the squares measurement across only 2 1/4 from the edge to the seam. So if we add up along the whole section you get 2 1/4" + 3/4"+ 2 1/4" = 5 1/4". The height is also minus the seam allowance on one side so it's 2 1/4" + 2 1/4" = 4 1/2". Making the larger rectangle 4 1/2 X 5 1/4". Now you could always sew the whole 4 patch then measure out the size needed, but that's dangerous especially if you made a mistake when you cut one piece. It's better to know how to draft it right.
Now I wanted to know how to make the squares like Jeanne made for her son Nick's quilt. So I went looking. I read on the package that it was a 10" Finished block, but they considered one block to be 4 put together. SO I needed 5" finished blocks. Plus the small sq was itself a tiny block! SO I had to break it down even further and get the measurements of that 2.5" finished block.
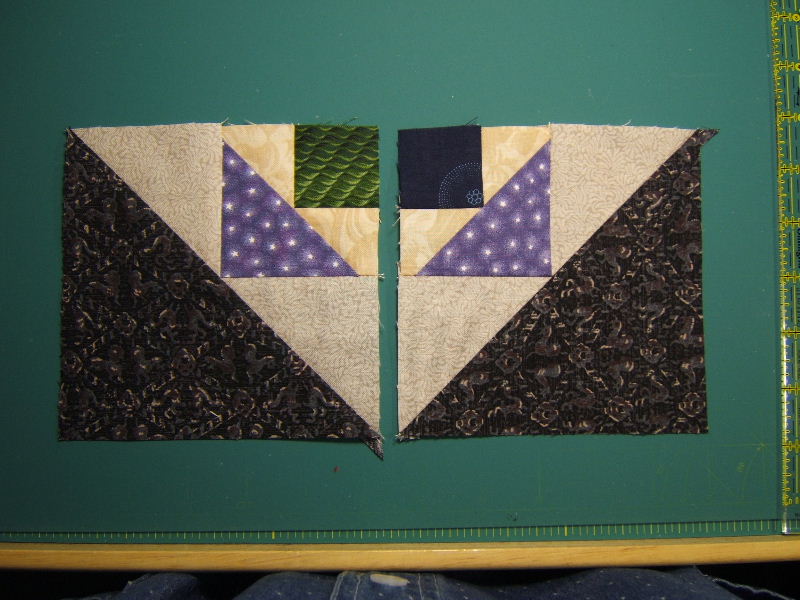
This tiny square needed to be 1 3/4" cut, the rectangle 1 3/4" x 2.5". Here it is sewn together in the stretched 4 patch with the seams marked ready for sewing: Then the finished tiny blocks that measure 3" unfinished (2.5" finished). Much smaller than what we made before:
Next I had to make the light rectangles for the sides: When you have anything in that square space besides a solid square, make sure they point out and up and out and down in opposite direction of each other! This is very important or they will not come out placed correctly. If you have a half square triangle as your corner section... you start with a 2 7/8 squares, make HST's, then point your light towards the outside. I sewed the rectangles onto the tiny blocks serving as the squares and pressed towards the blocks:
 Sewed the top to the bottom and pressed. See the front and the back:
 I then placed right sides together with the large rectangle of black fabric. Now you can see that depending on whether or not your "squares" end up in the top left and bottom right or the opposite direction as here, you will either lay your ruler on the correct side or BACKWARDS as I have done. It doesn't matter as long as you have the black triangle off the top edge and your line goes through the two blank light rectangles! See my writing is backwards!!
I drew my line. Placed a straight ruler on and drew a 1/4" line on each side of the cutting line, sewed on those lines, like before. 
And now I have 2 blocks just like Jeanne's blocks! They finish at 5 1/2 inches and when sewn together with 4 of them they will be 10 inch blocks!
Lord knows this was super hard to write! I appreciate so much all you guys who write these up all the time. Of course, just telling you the sizes is much easier, but unless you understand how to break it down and figure out the sizes, you really can't use the trick to it's full use! I am pooped!